Wednesday 28 December 2011

My 2011 build review

Hi folks,

Well I'm not going to get the Hampden finished this year, but should get to it mid next month.

It's been a very strange year, what with the ongoing earthquakes here in Christchurch NZ, I feel like I didn't accomplish anything, but to my surprise actually got a few done. All rollicking good fun, with lots of input from you fellows, thanks very much

Have a jolly pleasant new year, all the best.

Jim

Lindberg 1/200 Snap-Fit Space Shuttle


Heller 1/72 F-86F


KP 1/72 Mig-15


Airfx 1/72 F-86D


Airfix 1/72 Bird Dog

Airfix 1/72 BF109G (old mold)


Airfix 1/48 Bf109F


Matchbox 1/72 Wellington


Airfix 1/72 Whirlwind

Airfix 1/72 Hawk (new tool)


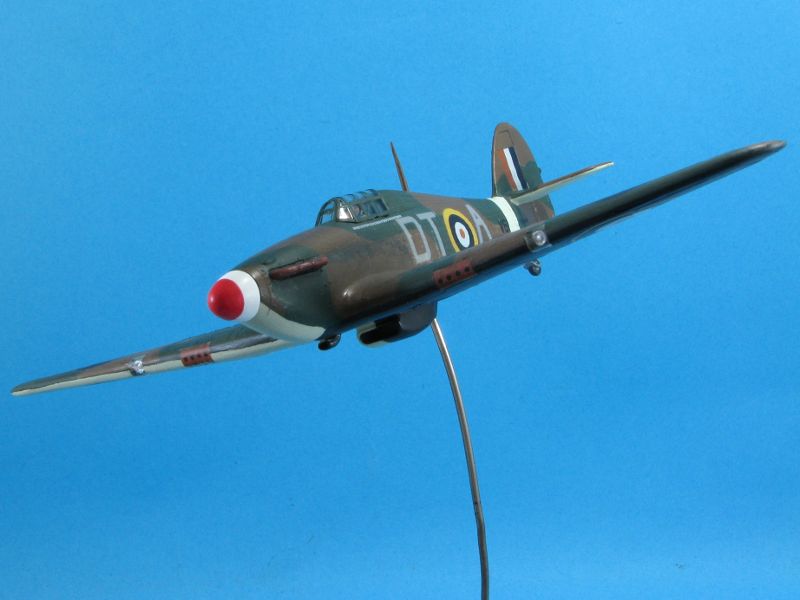
Airfix 1/72 Hurricane Mk1

Revell 1/72 Sopwith Camel

Monday 26 December 2011

Airfix 1/72 Hampden - canopies plus

Vac formed up a couple of replacement canopies..

Built a radar aerial and a gunsight, the fighter Hampden certainly needs a gunsight.

 Then stretched up some tube for cannon barrels..
Hopefully paint the canopy sills. add the crew and then attach the canopies.

Thursday 22 December 2011

Airfix 1/72 Hampden - fin fiddling


I was unsure about the fins, they didn't quite look right...

a bit too tall and square, looked more like Whitley fins.


So this is where we started, compared with the kit fins, thanks to the great input from the guys at the UAMF, I decided to do a bit of shortening and shaping to get these...


follows the Hampden fin shape and slightly taller...


I'm a lot happier with them now.

So canopies to vac, and spinners to sort out, then we'll be almost at paint.

This is too much fun.

Sunday 18 December 2011

Airfix 1/72 Hampden - engines and wings on

Hi folks,
Got the engine mounts faried in, and cemented on,

a coat of primer and a little bit of touching up and the wings are on.

laminated some plasticard to make enlarged fins, and the first one is on.

added a couple of troughs in the nose for the cannons, and some holes for the machine guns, I'll stick some barrels in later.

All the best, happy Fill'n Sand


Tuesday 6 December 2011

Airfix 1/72 Hampden - engine mounts

Built a couple of mounts for the Airfix Lanc nacelles..
Image
traced the inside of the nacelle, stuck the tracing to some card and then sanded to the traced pattern. Stuck that to more sheet, and traced the outside of the nacelle, and sanded to shape.

Had to sand the front of the Hampden engine mounts/nacelles flat, then attached the mounts to them.

Image
Now the transition to the Lanc nacelle can be filled and shaped, without having the nacelle in the way.

Plenty of Fill'n Sand ahead.

Monday 5 December 2011

Airfix 1/72 Hampden - fuselage and wheels

Got the nose and underside sorted out..
Image
Need to come up with a canon belly pod, and think about the nose guns and radar aerial.

Finished the wheels, and thought about how to mount them and make not have to mask them. The last few models I've built , have had partly exposed wheels, and they have been a pain to mask, so this time, I decided to try something else.

Cemented in a section of sprue along the wheel opening..
Image
took a painted wheel, marked how much stuck out of the opening...
Image
and sliced it with a razor saw, giving this..
Image
now I can add the wheels after its finished, yay!

Now to mount those merlins to the nacelles....
plenty more Fill'n Sand ahead

Saturday 3 December 2011

Airfix 1/72 Hampden - Engine mock up

Well fuselage is together and a big section of plasticard on the underside, now in the midst of Fill'n Sand it all togehter.

While the fuselage is togehter, I thought I'd mock up the engines and see how the options look..
Kit cowlings.

Lancaster Merlin naccelles...


I quite like the look of the Merlins, they seem to match the skinniness of the fuselage.

Fill'n Sand ahead..

Thursday 1 December 2011

Airfix 1/72 Hampden - interior..

Got an interior knocked together, I'm not using any of the PE on this, just good old plastic.

 and got some paint on it.


The radar op checking his screens..
Got the fuselage together, now just patching up the underside, then on to the nose and wings, those engines.. hmmmm...

Wednesday 23 November 2011

Airfix 1/72 Hampden - Change tack

After seeing some cool Whatif's in the UAMF Airfix Angel Interceptor group build and stumbling across this thread on Whatifmodelers..
http://www.whatifmodelers.com/index.php?topic=24619.0
I have thought to do a Whatif, night fighter version, slimmed down and packing some big frontal armament.

So have cut the bomb bay off the fuselage halves, sliced the nose glazing and added a section of bomb to fit, so gives this nose shape..
I've found a replacement pilot, and am leaning toward no rear guns, as the rear chap will be the radar operator.

Some fun Fill'n Sanding ahead.

Tuesday 22 November 2011

Airfix Devastator - Vac Canopy

Well I have been battling with the canopy, and a overwhelming lack of interest due to having to make a replacement canopy, but I have pushed through it and come out the otherside, or some such bumf...

Started with this ...
a big gap at the rear, so I cemented all the pieces together added some plasticard sections to the rear fo the canopy, then sanded all the frame lines off. Reattached the front windscreen and rear section which came adrift... cemented a section of plastic card across the bottom, and a section of drop tank to support the windscreen, a squirt of primer and a sand, then vac formed some plastic this afternoon..
Not bad, a few speaks of dust in it, and a stray hair, good enough for me.. a trim with some nail scissors, and she's a good un..

I'll lay a few strips of stretched sprue to give a lip for the canopy to rest against, then cement it on.

Sunday 20 November 2011

Airfix 1/72 Hampden - Fondling the plastic..

Well I've decided to take part in a Airfix Hampden single kit group build on UAMF. Everybody has to build the Airfix Hampden kit, and can do it anyway they want. out of the box, addtions, what ifs, anything goes as long as its the Airfix Hampden kit, and you share your progress and join in the banter. Lots of Coastal Command schemes being done, looks like most of 489 Squadron.

So I dug out my Hampden from 'The Stash', I've got the Flacon vac canopies for it, and the Airwaves photo etch set for it. I don't know if I'll use much of the photo etch as I'm suspicious not much will be seen. I've not used photo etch before either so a bit nervous about it.

So here is the box art, an old boxing..

The extra bits and kit decals, whcih look like they have passed their 'use by'

The good old black plastic, lots of rivets, but they look good, nice crisp and good detail.

Canopies are very thick, so I can see why people suggest the Falcon vac set, I'm a little buit suspicious of the fit of the vac canopies though, the nose seems a bit wide, but I havn't cut it out of the back yet.

I'm not sure of which scheme yet, I was going to do a 489 RNZAF Squadron one, but there about four being done, so it'll be a bomber command one, I'm leaning towards an early scheme, with the big A1 roundals on the wings, but I'll decide later.

Wednesday 9 November 2011

Airfix Devastator - Canopy short?

The canopy has been worrying me, I thought it could be a problem: three sections and heavy framing, good prospect for a vac replacement. I cemented all three sections together and then laid it on the fuselage..
rightio, it's a bit short then....
My plan is to add to the rear section with plasticard, sand off the framing and then vac a replacement.

Sunday 23 October 2011

Airfix Devastator - wings and cowling

Had a 'can't think of anything to do around the house' time this afternoon, and got a couple of hours in on it.

And I was devastated when I clamped the fuselage together, one of the clamps slipped and took the rear guys arm and the DF loop with its base off. The arm I recovered, the smallest bit knocked off, but the DF lop and base have been digested by the carpet monster..
[linked image]
so made a new loop and base.

Finished up the engine and got it in the cowling..
[linked image]

Modified the cowling as the cooling flaps (to me) are not very well defined and they are moulded open..
[linked image]
So using my newest favourite tool a tamiya etch razor saw, I circled around the front edge of the cowl flaps and then cut down each one, and sanded the 'openess' off. Its meant I've had to sand the fuselage a bit as it took on a decided bulged look with the cowl flaps closed looking.

Also attacked the wings, now why did they attach the wings like this..
[linked image]
sprue gate and a long one right on the leading edge with that lovely ridged detail.

So I was puzzled what to do about when I thought of my new favourite tool (I did mention my new favourite tool didn't I?)..
[linked image]
sliced off the sprue gate, the fine teeth means there is no pressure on the joint and doesn't distort the plastic.

Sanded along the length of the wing..
[linked image]
until level with the existing ridges and..
[linked image]
gently trimmed the excess out with a sharp knife. Repeated for all four outer wings sections.

There is a folded option, which means each wing is in fours pieces, and it looks to me, to have them spread its a butt joint. So I attached the outer and inner quarters of each wing together and have reinforced the joints with sections of plasticard.
[linked image]
So we've managed to keep the top and bottom surface level, and hopefully won't have to sand the joints and loose wing ribs.